Sunday 7 December 2014

Reproduction Canadian Seven Button Tunic

The creation of all this obscure Canadian webbing has made a quiet but insistant demand that there be a seven button tunic to go with it. The seven button tunic is distinctly Canadian and was the battle dress of 1914, the tunic of the militia units at the war's opening. While the Oliver Pattern webbing and the 1915 pattern never made it to the Front this tunic did and had a certain mystique as the uniform of the Canadians who first fought in France and Flanders, so much so that later soldiers seem to have hooked their fold-down five button collars into a stand-up version of the Canadian tunic. Here's a photo of my grand father in November 1915 with his PPCLI gun crew, British tunic all the way, even with British buttons, but the collar points drawn together. (Lower left).


By contrast, on enlistment, he looks like this.


Finding differences may seem academic at first, but it was a distinction recognized by the soldiers themselves. It simply wouldn't be right to put Oliver Pattern equipment on a five button tunic. For this reason I researched several examples of the seven button tunic in Ottawa finding that the only constant element was....seven buttons, and mostly a stand up collar.

This topic has been covered in another blog so I won't repeat myself here. Check this link:


The point I wish to emphasize is not so much the details of the seven button tunic, or even the reproduction by What Price Glory, but the difficulty in creating a single representation at a time when there was no absolute standard. Here, then, a reproduction becomes an impression, like a sketch. It is the essence, distilled, and yes, there are two more buttons beneath the Oliver ammo pouch in this photo.


What Price Glory is now reproducing these tunics in sizes for the modern man. Don't be scared off re-tailoring! They did that in the trenches too. 

                      http://onlinemilitaria.net/shopaff.asp?affid=1497


Reproduction Canadian 1916 Equipment

Much of my work for What Price Glory has been to seek out artifacts, for which the company has no records, and to send detailed information so that these can be reproduced. I'm prepared to take some credit for accurate recording of details and the work I've done on prototypes and mockups, but great credit must go to the team in India which knows exactly how to give everything the right touch. So it is that What Price Glory is now able to sell Oliver Pattern equipment and will soon have 1915 equipment for sale.

Here is the 1916 equipment now produced for sale.

      http://onlinemilitaria.net/shopaff.asp?affid=1497                     


The basis of the 1916 Canadian equipment was taken from the artifacts that What Price Glory had, the big exception being the back pack which I researched here in Canada. One day I was conferring with Ashok in India, by email, and we were discussing belt details. I do have two badly damaged belts so I thought I might know what I was talking about. I then realized that the two belts I had were quite different from each other. Consequently I became aware that one of the belts probably had an error in its construction. A fitting had been put on the wrong side. This made me realize that artifacts themselves can also be "wrong". I was also powerfully aware that the reproduction belt I had was a clearer record than these poor damaged relics I had in my hands.


For the most part the items I have researched do not belong to me and I no longer have them as references to match to the reproductions. I can only see that what has been reproduced matches my own photograph collection exactly. A most recent departure from this has been in the 1916 Pattern ammunition pouches. A friend of mine recently gave me an original that he has owned for over 60 years. I now have a chance to compare the What Price Glory reproduction to an original. Except for slight dimensional differences in the buckles and the absence of folding score grooves in the flap there is no apparent difference. And as far as that goes both of these differences could be attributed to manufacturing inconsistencies since the ammunition pouches of 1916 were made by different companies in their original production.


Here are more photographs showing the remarkable exactness of similarity between the reproduction and the original. It should also be noted that no attempt has been made to colour the reproductions on the belief that it is time which has made these old pieces of leather so dark. Indeed, the reproductions I own have become a rich brown colour in just the short year they have been exposed to light and the sun. One can only imagine that in battlefield conditions greasy hands and dirt would add their toll to the leather's tones. For anyone who buys any of this equipment rest assured that the light colour is perfectly consistent with the look of the original the day it was first issued to a soldier.


In this photo, below, two straps details are shown. I've seen other originals where the straps have been sewn into the body. As someone who makes prototypes in leather I am aware of how much simpler it is to use a rivet.


I had another interesting revelation in this business of inspecting originals and reproductions. When I first put my reproduction to the test I was surprised to discover that the stud on the belt loop portion of the strap does not have a superb holding power. After a short amount of time and usage it seems that the strap can sometimes pop off the stud, which means that the pouch leans forward off the belt. This could be an issue when one actually unbuckles the pouch flap. I worried that this might be a defect in the reproduction. Now that I have an original I discover it has the same characteristics. Once again it becomes clear that the reproduction, if it is worth it salt, must reproduce all the defects as much as any other aspect of the original. Here is a comparative illustration, below.


There is not enough body to the leather on either side of the slit to stop the sides from spreading apart. Could this be one of the issues which dissatisfied the British with regards to this Canadian equipment?

For more information on the 1916 Canadian equipment refer back to my past blog with the link here.


Below is a photo of the newly available 1916 water canteen carrier frm What Price Glory.

                      http://onlinemilitaria.net/shopaff.asp?affid=1497


Saturday 22 November 2014

Reproduction Canadian 1915 Equipment

In my post on the WWI bicycle I looked at reproduction as an evocative tool which takes more from theatre than studied reality. The post on the Oliver Pattern equipment saw reproduction as a record of fragile artifacts to safeguard knowledge of them and to allow for that knowledge to be broadcast widely. This next post looks at "reproduction" as a tool to seek knowledge and understanding in order to fill in gaps. In this day and age it's also a tool to reach the world hoping that someone can correct mistakes.


The subject in question here is the Canadian 1915 equipment seen above on a march through the Ontario countryside. I've written about this in the blog   http://leathersatchels.blogspot.ca/    and told the story of the search for details. I suggest the reader of this blog should refer to that one too.

The search for artifacts to study is ongoing and I'm hoping that this new title will catch someone with information to share. As stated in the blog the reproduction company What Price Glory has been able to reproduce certain elements of the gear from known artifacts. Thus there are now reproductions, soon to be available online, of the ammunition pouches and the revised belt. There is also full knowledge of the altered haversack. Good reproductions of any of these can stand as representatives of that knowledge. 


The problem comes in making reproductions of the parts for which we only had bad resolution photos. Still, by studying these it is clear that the 1915 yoke was the Oliver Pattern yoke recut. 


Below is the prototype reproduction of the equipment above.


The points of attachment of the straps are necessarily derived from the Oliver Pattern equipment but there had to be some surmising to complete the picture. So here are the matters up for correction, if indeed correction is needed. These are my adaptations and they bear the limitations of hand stitching and hardware that is store bought. What Price Glory is in the process of turning these images into their reproductions, with the benefit of machine work and the reproduction of hardware as it could have been. This work will soon be available online.


All this work is done in the interest of being right but also in the hope that if anything can be improved on someone will come forward with what they know. So.... Does anyone out there have their grandfather's equipment in a box? There's a good chance this equipment is in England. Look in the cupboard under the stairs, or in that old trunk stashed under the tiles .

In the meantime keep watching What Price Glory for updates to their site.

January 17 

I've received the What Price Glory prototype for the yoke. Here are the details which are an improvement on my own efforts. Hopefully this will be for sale before too long. I'm told that progress is being made of the haversack and large pack. Keep watching!


And here's another discovered photo of the 1915 pattern in use. To my eyes this confirms the details you can see above.


                      http://onlinemilitaria.net/shopaff.asp?affid=1497

Reproduction Ross Bayonet Scabbard and Frog


In the blog about leather webbing I ended with a challenge to readers to make a reproduction of the Oliver Pattern water bottle carrier. I would like to post everyone's version. Check the challenge here:


This is a new challenge to make the Ross bayonet scabbard and frog. I have an original so one might wonder why I would want a reproduction. First off having one would be consistent with a reproduction uniform, and also it's a better idea to leave a fragile original at home. But secondly the requirements of reproductions lead to a deeper understanding of the structure and methods used in producing originals. 

Here is the original:


The scabbard and frog are joined by a staple on the back and cannot be easily separated.

I started by creating a paper pattern. The measurements are indicated here for the challenge. 


I guess the leather to be 7-8 ounce or 7/64" to 8/64" thick. What I used was 8-9 ounce and it was too heavy. It is an unyielding tooling leather best worked after a short soaking. But be careful as the wet leather quickly takes on a stain from its interaction with steel tools.

The paper pattern for the scabbard was transfered  to the leather and holes were marked and pricked through. This picture shows the inner, or flesh side, of the leather. I put a slice into the edge 3/16" in, my hope being the leather would bend more easily as I had to work it. Later, as I found my leather hard to sew, I was driven to use a drill press to pre-drill the holes. I remain amazed at how sewing machines pump through this stuff. That being said I believe the last stitches on the scabbard were done by hand.


In this next photo I have cut back to the line on the section that will be hidden by the frog. The stitching has started. See how I have wetted the leather and bent it and folded it onto itself.


I work the stitches down to the far end. It looks as though I'm making a sheath from the Wild West but the next stage is to flatten the wet scabbard onto itself from a 90 degree direction as can be seen in the second photo. 


At this point it is necessary to force the pliable leather into its shape, and especially to work the seam. As I did this, and reflected on the originals, I wondered what steel forms they must have had to make this work easy. Studying the original stitching I could see machine marks to the curve. From then on it might have been sewn by hand. The originals also have metal components at either end which I'll speak of later. These are more than I can do in this reproduction. I have also completed a herring bone stitch in the section to be covered by the frog. This is not a part of the original as you will see.

I put this away to dry and then started the frog.

The frog uses the same leather and similarly I ended up working it wet. Here is the paper pattern.


And here is the pattern transfered to the leather which is cut out and pricked through.


The belt loop gets sewn first. The wavy end is my bad cutting as I tried to skive, or taper, the end of the piece. This will be hidden though.


The "T" end of this piece has a subtle curve because the frog tapers slightly to accomodate the skived belt loop end.


I determined the next hole placements after wrapping the wet leather around the scabbard. In the making of these there are judgement calls based on working the leather into its proper shape. It's hard to specify exact measures. Much depends on the nature of the leather used. It's also easier to work around a Ross bayonet and the completed scabbard to be sure of the fit and to make adaptations.


The next step was to sew the frog together hoping it would end up neither too tight nor too loose. In the end on this one I was tight, but not too tight. The last stitches are figure-eights.


After the sewing was completed I trimmed the leather back close to the stitches.


While it was still wet I stretched the frog with pliers and so was able to insert the scabbard.


To all intents an purposes the scabbard and frog are finished. After they dry I can wax them and put a metal cap over the tip which will be cut off square. Leave your last stitches about a quarter of an inch short of the end. The tip in this reproduction is a large well crowned thumb tack. Then I finish off with a wire staple to join the two parts and a rough cut hole to hang the bayonet on a nail, just as seems to have been done in the trenches.


The finished scabbard and frog look perfect but they are missing the vital metal components. Thus they are evocative reproductions only. I knew I couldn't reproduce the internal metal parts but I figured I could do my best to draw them. And as I peered inside the scabbard and checked the tip with a magnet I was over taken by a wish to get to the root of the matter. At least, I felt, I could pull the staple and separate the two parts. And so I did. This is what I saw after the scabbard came free of the frog. 


And when I removed a hidden staple on the other side I found this:


Looking inside the removed metal sheath reveals the workings of two spring plates designed to secure the bayonet.


In the end these revised drawings show the overall workings of the original.


I see now I've drawn my small studs in a reverse to the artifact. So much fo the eye witness! I'll have to correct that!...."Did the witness see the double studs at the top or the bottom?" ..."The bottom your honour"...."GUILTY of gross neglect of observation!"


I now feel thoroughly knowledgable of the workings at this end of the Ross bayonet, but the true nature of the metal insert and domed tip that give form to the bottom end remain a mystery. The drawing is my best guess. The staples, by the way, get banged in through the leather and the holes in the steel and bend against a hard steel insert in what ever way they please. It seems crude but it held this scabbard and frog as one for 100 years. I put it back together easily after I'd taken the photos. The thing to remember is that the scabbard is simply a protective sleeve. The real holding power is in the metal device held by the frog.

Here are the staples.


And the new Ross reproduction takes its place with the rest of the Oliver Pattern equipment.


Incidentally, the messtin is made of old fabric, plywood, sheet steel, and hot glue. Sometimes the theatre prop approach can be quite effective.


February update. 

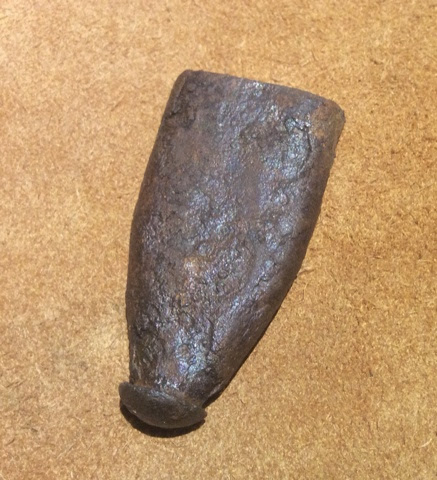
A blog reader contacted me and we got together to compare notes. He has lent me his very dead scabbard. With his permission I have removed the bottom metal piece. Here it is:


It seems, at first inspection, to be made of two pieces with the end nub riveted in place. I shall make new leatherwork around this to restore it and get a sense of "how?"

The upper metal parts are braised I think.